Download and install a build environment
The Sparkfun Redbot, Pololu 3pi, and Pololu Zumo robots are all based on the Atmel atmega328p processor. All three have a wealth of libraries and supporting software. All three support at least the two most popular methods of creating code for the AVR processors, Arduino and avr-gcc (Windows and Linux). The two Pololu robots also support the Atmel Studio build environment.
Downloading and installing the Arduino environment is pretty straight forward. Download for your environment, unzip or untar, run. Not much more to it than that.
Atmel has taken over the support of the avr-gcc tool chain and hosts the builds for Windows and Linux. Installing the tool chains for Windows and Linux are documented on the Atmel site.
Get the supporting libraries
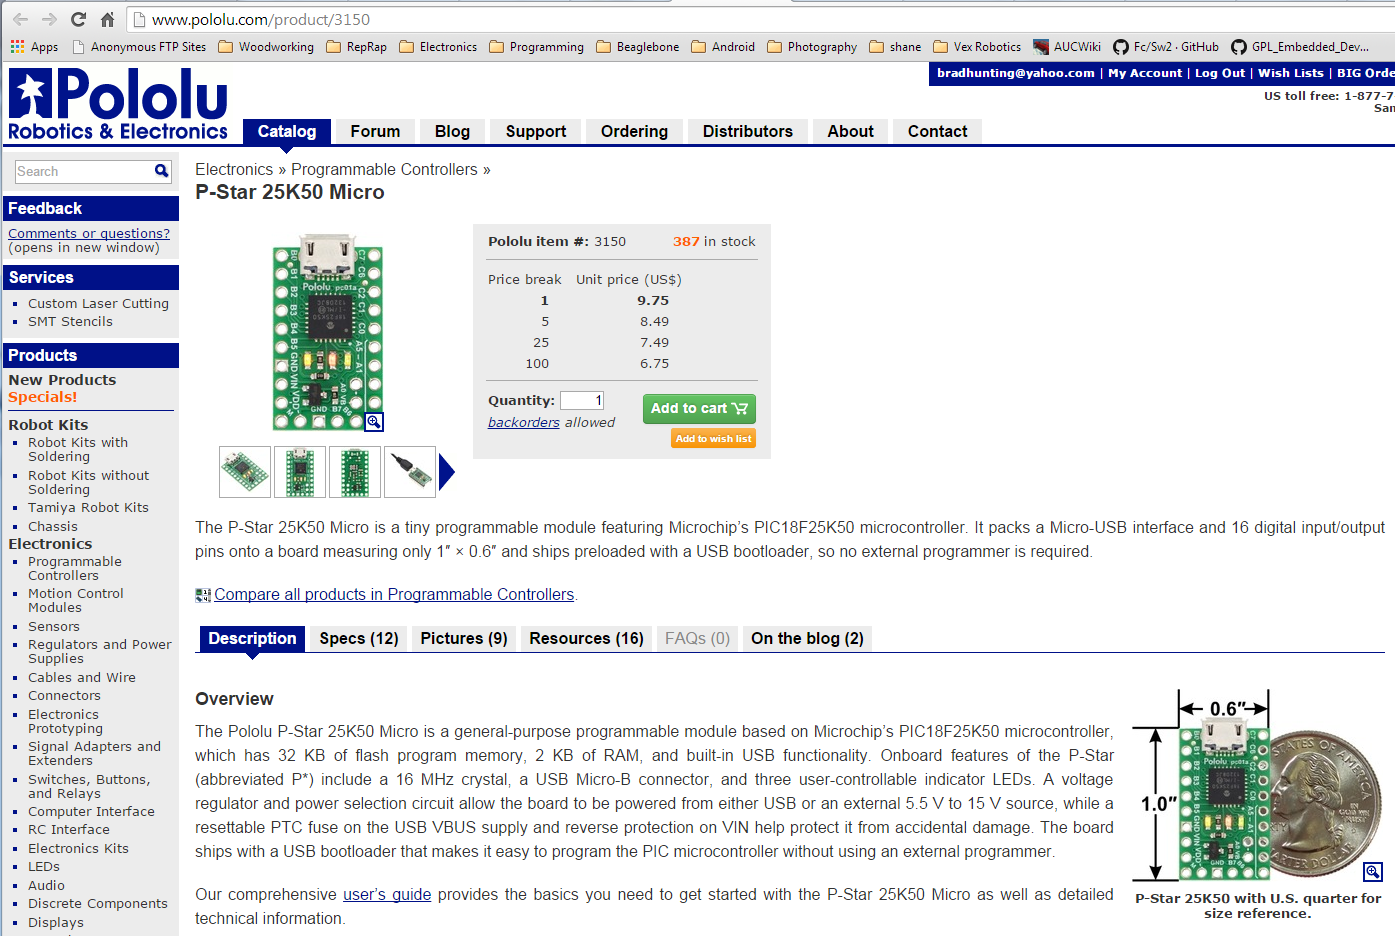
All three robots have additional supporting libraries; Arduino style for the Redbot and Zumo, Arduino, Atmel Studio, and straight avr-gcc style for the 3pi. Both vendors, Sparkfun and Pololu, provide links to download their libraries. Pololu supplies prebuilt installers for different versions of their libraries. Both companies also provide source on Github; Redbot / Zumo / 3pi. For the Zumo you want both the Zumo Shield library for Arduino programming and the libpololu-avr library for direct avr-gcc programming.
I prefer to go straight to the source and download the libraries fresh from Github. All of the libraries provide a “Download Zip” link to download a compressed bundle straight to your desktop. After you have the downloaded bundle you can uncompress and install it. I prefer to use GIT directly, under Windows and Linux, and clone the repositories directly to my desktop. Whichever method you use you will eventually have copy of the libraries on your local machine.
To clone the repositories locally under Windows I use the git bash shell from git-scm, under Linux I use git. If git is not installed on your flavor of Linux use your distro’s package manager to download and install it.
Install the libraries
The Redbot and Zumo Arduino libraries need to be installed where the Arduino environment can see them. Arduino provides tutorials on installing 3rd party libraries so I wont repeat that information here. Pololu also provides ample documentation on installing their libraries, for all three environments, Atmel Studio, Arduino, and raw avr-gcc.
For the Pololu 3pi robot I am using raw avr-gcc. The steps I used to install the Pololu libpololu-avr library are:
1 ) Insure you have the avr-gcc tools installed
From a command line run avr-gcc –version
If the program is found move forward, if not, return to installing the avr-gcc tool suite.
2 ) Build the Pololu Library
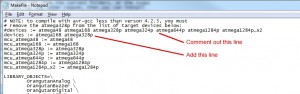
The Pololu library make file by default builds all of the flavors of AVR libraries for all of the Pololu products that use the library. For the 3pi you only need support for the 168 and 328p libraries.
New 3pi robots are based on the Atmel AVR 328p processor. Older 3pi robots were based on the 168 processor. The example program makefiles still reference the 168 library. At this point it is easiest to keep both the 168 and 328 libraries. Over time it makes sense to migrate to the 328, if you have a newer 3pi robot, but for the sake of expediency build both libraries for now.
Edit the libpololu-avr/Makefile and remove the building and installing of unneeded libraries.
In a command window in the libpololu-avr directory make the libpololu libraries. Simply type make in the libpololu-avr directory. The build process should eventually yield two files called libpololu_atmega168.a and libpololu_atmega328p.a. These are the 168 and 328p libraries containing the functionality provided by the Pololu library.
3 ) Copy the libraries and include files
Next you need to make the libraries and required include files visible to avr-gcc. You can either modify the example make files as you create or re-use code to point to your local versions of the pololu libraries and include files or you can copy the library and include files to the avr-gcc default path. Pololu recommends copying the files into the avr-gcc path.
See the pololu/libpololu-avr/README.txt file:
== Manual installation ==
If you have the source repository of the library instead of a binary
distribution, you will need to build the library (.a) files by running
"make" and also copy all the files in the "src" subfolder into the
"pololu" subfolder.
Next, copy libpololu_*.a into your avr-gcc "lib" subfolder.
Finally, copy the entire "pololu" subfolder into your avr-gcc
"include" subfolder.
You are now ready to use the Pololu AVR library.
Use the make show_prefix to discover the avr-gcc paths used in your install.
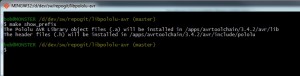
– Copy the library files, libpololu_atmega168.a and libpololu_atmega328p.a, into the avr-gcc lib directory.
– Copy the pololu directory, libpololu-avr/pololu, not just the files in pololu, the pololu directory and the contained files, into your avr-gcc include directory.
– Copy the contents, including any sub-directories, of the libpololu-avr/src directory, into the newly copied pololu directory in your avr-gcc/include path. In this case copy the “contents” of the src directory, not the src directory itself, into the avr-gcc/include/pololu directory.
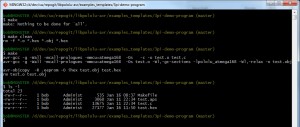
Test your install and build the demo code
If all of the above worked you should be able to change into the libpololu-avr/examples_templates/3pi-demo-program and type make.
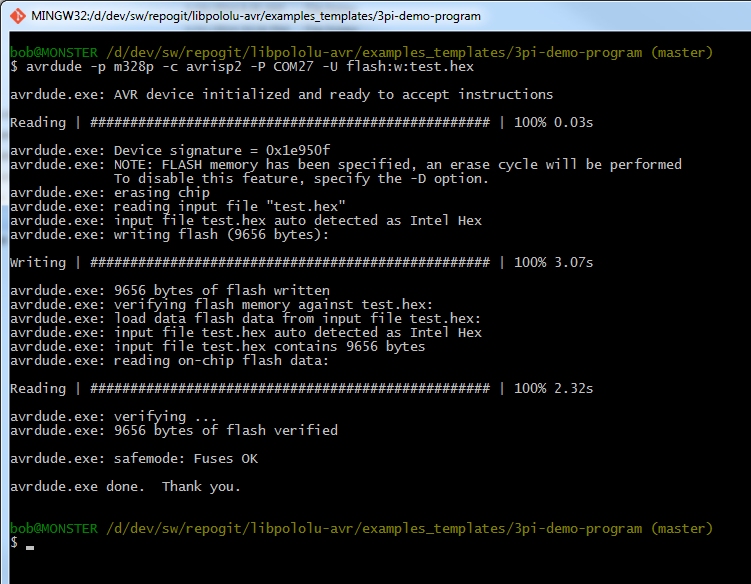
Now that you have a hex file you need to upload it to your robot.
I use avrdude directly from a command line. Using the Pololu AVR programmer the command looks like:
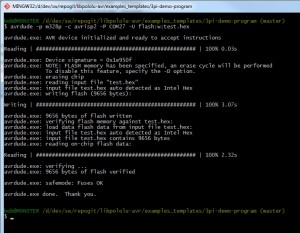
If everything worked cleanly you should have a fully functioning build and deployment environment ready to write new code.